
Ergonomics of graphics tablets – DIY Photography

The perfect graphics tablet doesn’t exist. But you’ll eventually adapt to the weird specifications and ergonomics issues of your tablet model and make it perfect for you. This adaptation process made by your body (in regards of the ergonomics flaws of your hardware) will have an impact your health on the long run. It might also affect your pleasure to draw and paint…
Since 2002, I bought and used a lot of tablets to try to build the best setup I could. It came as a necessity to ease my full days of digital painting. Nowaday, my quest for the best graphic tablet still continues as the technology keeps evolving years after years. If you want to read more about what I used and why, read my maintained “Tablet history log” article, from 2002 to today. But beyond the choice of the hardware itself, I also studied other aspect about it. And the first one that comes to my mind is the ergonomics of my desktop position. So, let me share with you my experiences about ergonomics.
Disclaimer: I’m not a professional ergonomist, I’m not working into the health-care industry and I wrote this article from the humble point of view of a digital painter who happen to paint almost daily with digital graphic tablets since 2002. This article is just based on my personal experience, it contains all my bias and should be read as the testimony of a random artist on Internet. I wrote it and share it because want to make it useful for other artist struggling with the same questions. This article doesn’t have the serious of something like a scientifically tested study made on a large group with solid statistics. If you find a paper like that, please write it in the comment, I’ll be the first one interested to read it.
General thoughts about other input devices
The keyboard
I guess I’m not the only CG artist that use a lot of keyboard shortcuts to speed up my work-flow. Vendors and designer of graphic tablet understood that clearly and started to add more and more buttons on their products to setup more custom shortcuts with easier access. Isn’t it a sort of confession that graphic tablets are designed without thinking of a good access to the keyboard? But since a couple of years, tablets vendors started to innovate into other directions and sometime added tiny devices that look like remote controls (a), or just added more buttons (b), or removed all physical buttons and propose a virtual keyboard with touch interface (c). I’m not sure where it the main tendency will go now.

The evolution of buttons on tablets
On their side, digital artists started to use additional devices at the side of their tablet: gamepads, one handed gaming keyboard, customisable keyboard. But even with this research for better accessibility of keyboard shortcut; this set of additional keys and devices will never replace the flexibility and completeness of having a full keyboard under one hand in my humble point of view. It is especially easy to to experience if you like to chat while painting, writes notes, reply to emails, add descriptions in your artwork or browse for references on the web while you are working. For all this task, you’ll need a full keyboard.
Unfortunately, large tablet (with a display built-in or not) tends to land on the desk at the exact place where the keyboard was used. So, their is a conflict; a competition between the two input devices that’s really hard to solve. Vendors of tablets haven’t put yet a lot of thought on this topic. The later part of this article will consider important to have a good access to the keyboard for this reasons.
The mouse
It is tempting to think graphics tablets can replace fully the role of a mouse. Sure they can. But for some workflow or games it is not always the case or the most convenient way to use the software. In many situations, a mouse will be more steady and precise and so the workflow will be faster using it. The mouse has buttons layout often designed by the developers who haven’t built their software to be used with tablet in mind (eg. the mouse wheel and mouse wheel click to zoom/pan). That’s why I think it is necessary to keep an extra mouse on the desk.

Stylus versus Mouse? And why not both.
Note about old tablets: Before 2010 many tablets −as was the Wacom Graphire 3− had a mouse delivered in the package. This one was reacting only to the active surface of the tablet. This trend was abandoned and I understand why: this device had to be removed from the active surface area each time the user switched between the pen and the mouse. I had two model like that; the built-in mouse was never used in favor of a classic mouse connected to the system.
1. Large graphics tablets
Large classic graphics tablet (without a built-in monitor) are certainly the most precise and comfortable from a technical point of view. But the number of large classic model available is decreasing and disappearing on the market over the time. It’s a shame because monitors went bigger for a cheaper price with the last five years and also got a lot more resolution. The same tendency should have been followed by the emergence of new large graphic tablet with high resolution. But it’s not the case.
Around 2000, a “1024x768px 15inch CRT” display paired with a Medium tablet was a good match. Nowaday, it would be hard to use the same size of tablet on one of our modern wide “FullHD 1920x1080px 21inch display” (and I’m not speaking about the 24inch, 27inch, quadHD, 4K resolution being more and more cheap and common). In this context, for modern users of PC on desktop with a large external monitor adopting a large tablet make sens to better control the pointer on monitor. Indeed, if you draw a circle sized like a small coin on your small tablet and it display a big sized balloon on your monitor you’ll have a feeling of non control over painting details. You can imagine how you’ll struggle to draw a little eye or a detail. It will always be possible but you’ll have to zoom a lot to balance your hardware issues of precision.
But large tablets have also a lot of cons. The first one being their price and the second one is the room it will take on your desk.
a) Large tablet on the side
The first way people usually place their new large graphics tablet is on the side of their keyboard, as a mouse pad. This position stresses and hurts the arm and shoulder. But this position might be good enough if your main task is typing text and if you’ll need the tablet only one or two time in the day. I saw this position being used by the one convinced the graphic tablet should replace the mouse. Vendors of graphic tablet made commercial campaign in the past to propose the tablet as the replacement of a healthier mouse. For the one with repeated stress injury because using too much a mouse, it can be indeed a good option. While visiting studios of 3D artists and video editors, I often saw this type of layout on desks. So, I don’t advice it unless you need a large tablet and have problems with mouses.

b) Large tablet centered
One solution is to put the graphics tablet at the center of the desk and use your keyboard on the left. Having the active surface of your tablet aligned this way to your display is also comfortable for your moves and increase your ability to paint during hours. But if you need to reach the keyboard too often, this layout can be quickly a pain. It will force you to twist your back to face the keyboard. Even at a slight angle and you’ll do the same with the neck to counter balance and look at your monitor. Also many useful keyboard shortcuts (eg. Ctrl+Z, Ctrl, Ctrl+S, Shift) are located on the left part of the keyboard. I wouldn’t advice a position like that either.

c) A trail for the keyboard (or keyboard on lap)
To keep the keyboard easy to reach a reasonable solution is to adopt one of this trail you can screw under any type of desk (except if your desk is made of glass) to get a keyboard that can be accessed under the desk. The cheap alternative is to put the keyboard on your lap. I had this setup but I’m not fan at all about the position to write on the keyboard.

d) Curved desk
Adopting a curved desk with a chair able to rotate improves the situation a lot over (b). By mapping devices closely all around you, you won’t be twisting your back or extending your arm too much. You’ll even benefit of having comfortable part of the desk to rest your arm. I had this setup for month while I was working on a studio and it was working really well. One of the problem with curved desk is often they are big, deep and require an angle in your room. I can’t get one at home for this reason.

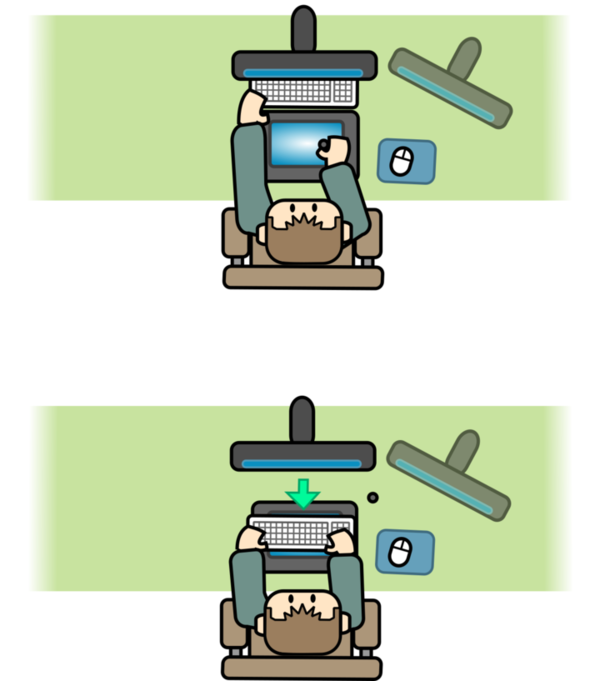
e) The keyboard up the tablet
My favorite layout and the one I’m using since years require a little bit of DIY. First, the monitor needs to float with one of this metal arm. This way you’ll have room to place more things under the monitor (you’ll not be blocked by the footer of the monitor). For the typing/keyboard position: place your keyboard on the top of your tablet. To protect the fragile surface of your tablet from scratches you’ll need to glue under your keyboard little sticky pads (usually made for putting pad under furnitures, sold in DIY store). The keyboard will glide more easily this way too to switch between position with just a gesture. Then the last piece of the instalation is to put a thick book or a plank of wood in front of your big graphics tablet (not visible on the graphic under, I forgot it) right under the display. It will be an area for you to push the keyboard or to grab it when you need to type something. The keyboard will remain also accessible while painting for shortcuts.

2. Small/Medium graphics tablets
This graphics tablets (still without a built-in monitor) have mainly smaller price and smaller active area. They are of course less precise than the larger tablets and the vendors of tablets often tries many attractive design and optimization to create cheap products. That’s why so many small/medium tablets exists on the market with a wide spectrum of quality and design. They are not more numbered because they are better; just because they are very cheaper. They are often known to be the first tablets of every consumers (and many digital artists started this way, me included). On a desktop computer, ergonomics of small graphic tablet are usually better with this size than with larger tablets and their short size.
f) Angular axis
Here is how I prefer to use this size of graphics tablet: I angle my full body axes to the edge of the desk and get this way a large spot to put my elbow. It allows me to paint during longer periods this way. You can note that while it was problematic to keep a large tablet (a)(b) on the side of the keyboard it is no more a problem for a smaller tablet.

g) Curved desk
Here again as in (d), adopting a curved desk will improve a lot the ergonomics of your workspace.

3. Laptop, mobility and travels
The users of graphic tablets often need to travel to other place to work. It means they often require a mobile way to work. This one can be on the transport, at the desk of a client, in front of a classroom or during a conference… For that, the vendors of graphic tablet often don’t propose a lot of creativity. Only one innovation on the market really changed everything: tablets with built-in computer and display.
h) The impossible match
Using a laptop and large tablet is a hell and often doesn’t work at all. I know it sounds obvious, but that’s something to consider while buying a large tablet: it isn’t really mobile-friendly.
i) The small tablet flexibility
Working with a laptop and a small tablet is not that bad and can face a lot of situations. Small tablets are usually also sized under a A4/Letter size paper. This is great to make them compatible with many bags; offering a lot of possibility to travel with them.

You can solve the pain by adopting a slight angle with the desk. I taught in classroom with setup like that (when the desk had enough room) and I did a lot of public demo this way too.

One layout I also enjoy is when I can cover the touch-pad of the laptop with the tablet and align it with the monitor.

j) In the transport
Little graphics tablet can be useful in a plane or a train. They are flexible to be used on this type of temporary and uncomfortable situation. But believe me, optimizing a long 5h train trip and completing a full artwork on the way feels very rewarding.

This way to work above is hopefully something soon of the past. Many touch tablet with styluses appeared on the market and propose much better ergonomics.

I’m rarely excited by this devices because I dislike all mobile operating system in general and I dislike typing on touch device. But maybe my feeling will change with the progress done by the technology. I’m hating less and less using my phone, so maybe the user experience will improve? Meanwhile, if you have the room for it, I still would advice for using them with an external keyboard.

4. Large graphic tablets with display
The big models of pen tablets with display all have in common big ergonomics issues. I owned or tested also a lot of tablets with a display over the years and the while the technology hasn’t changed a lot for the classic graphic tablets; the specifications of the graphic tablets with a display changed a lot over the years (thanks to the monitor, phone and tablet industries. I remind the first Ipad was released in 2010…). This graphics tablets allows working directly on the surface and the sync is better between the hands and the eyes. It allows to do gesture drawing more easily and get more precision for line-art and drawing.
The large tablets with a display first appeared on the market as very expensive devices. Nowaday their prices has been divided into three compare to what it was around 2005. The problems of this devices: parallax (distance between the tip of your stylus and what appears on the screen), hand might gets warm on some area of the devices leading to sticky hands and having to wear a glove (a side effect of having an electric monitor under the palm), the surface of the tablet is rarely able to offer a good texture (vendors and designer have often to choose between getting a slightly blury but textured feeling for the stylus or a crystal too smooth clear glass for the display), the surface is fragile (dirts trapped between the stylus and the surface can scratch this one) and it’s harder and more expensive to replace the overlay-sheet on a display tablet than on a classic tablet.
k) A surface tilted: a three dimensional issue
The surface of the tablet will always be tilted like an easel: it’s rare to get a big model flat enough to use it as you would for a large sheet of paper, flat on the desk. So, you have to use the built-in footer provided with the tablet, designed often for being used into only two main positions: an easel one with more or less angle (but starting always too high on your desk compared to the thickness of a sketchbook) and a vertical-like position to use the tablet as a monitor. This angle increase the difficulty to access to a keyboard on the side; so it is useless to place a keyboard this way.


l) Keyboard on top
Because the surface is tilted, you can’t put the keyboard over the surface. You’ll have to buy a dedicated rigg for that (in orange on the visual under). Companies propose this but it’s never proposed by the vendors of tablets themselves while I think a built-in solution part of the big display tablet designed for that would be great.

m) Keyboard under it
Placing the keyboard on your lap −often meaning under the desk− is one bad possibility as it will put more distance between you and the surface. Putting the keyboard under is another variation about it that might work.

n) The dual position
With a chair having wheel it is possible to use a large pen display connected to a computer having already a keyboard and a small graphic tablet. This way, you keep the large pen display for just the long hour of painting.

o) The big DIY
One of the best way to use a large pen tablet is to cut a hole on the desk (a drawing table) and merge the surface of it on the table/desk. This is a rare setup, but one I saw among many professional manga artist. You ‘ll see in this video in Japanese by artist Yoshikadu the step by step of making a complex rigg like that. Impressive!

Note about touch devices: I never tried the very large pen tablet displays with ‘touch’ on screen virtual keyboard. My feeling are mixed about them; while I see how it could solve many ergonomics issue by having a keyboard around a corner of your screen, I’m still not fond of typing or gaming on touch keyboard and I find this on-screen-display still inferior to a real buttons…
5. Small graphic tablets with display
Small graphic tablet with a display are usually cheaper than the larger model but also more flat; and this detail change a lot of thing because you can use them as you would with a sketchbook or a sheet of paper on your desk. They often are able to be used as well with an external monitor and mimic a classic graphic tablet. This hybrid setup often propose the best of both worlds when managed correctly.
p) The hybrid setup
The small graphic tablets with a display often already have the size of “large classic tablet”(without display). A 13inch or 15, 16inch might be as large as a Large classic model. By using them with the picture on the monitor cloned to the main display; it’s possible to get a hybrid workflow. Using the tablet and keyboard ergonomics of a classic large tablets and get the bonus of having the possibility to look at the tablet to control gesture for more precise drawings.
Conclusion
As I said in the intro, the perfect graphics tablet doesn’t exist and your best chance to find the one that suit your body and lifestyle might probably to try a lot of them. But also I want insist that we all have bodies and habits that can adapt: a not so comfortable tablet, too smooth, too large, might become your best hardware and best tool if you do the effort to commit at painting hours and hours on it. It also work this way.
So, if you already own a tablet, take care about it and whatever model it is; it can produce your next masterpiece. Just understand it, and just with what you find around yourself and a bit of DIY you can already build and optimize a better environment to enjoy your painting time longer. I hope this article inspired you to take care a bit more of your work position and think about it more. If you want to share your experience and continue discussing about this, you’ll be welcome in the comments section on the footer of the page.
Foot notes:
- All artwork (Inkscape source for the asset) examples were drawn with a male figure, right-handed. It wasn’t designed to exclude all other genre and left-handed artists, I’m sure you’ll get it and understand how to adapt this example to your situation.
- As I’m French, my English is far to be good enough to write an article like that. If you notice some mistakes and want to contribute to make it better, feel free to grab the source file of this article (link under, markdown file) correct it, and send me back by email with your corrections.
About the 2020 remake of this article: For the ten years anniversary of this article (originally published the 11 april 2010) I decided to rewrite it and refresh all the article. I also made new artworks and published them in higher quality. Over the years, I was super happy to see this article being republished on big CG portals, printed on CG magazines and even the artworks were republished by Wacom on their blog! Recently, I had the request for another repost; but after re-reading the article, I felt it to be totally obsolete and not really sync with what I’m thinking now… Since 2010 many things happened: the first Ipad-like tablets with styluses, the historical monopoly of Wacom breached after their patent for battery-less stylus expired and competition could finally start on the tablet market with many new models (Huion/XpPen/etc…) and pen display tablet are cheaper to buy and more and more common on the desk of artists. So, this update was more than just necessary. I hope you’ll enjoy reading it.
Changelog:
- 2020-09-13: For the ten years, refactor of the article (artworks and text).
- 2010-08-04: proofreading pass, thanks Slug45!
- 2010-04-11: Original release date of the article.
About the Author
David Revoy a.k.a Deevadis a French artist with nearly 20 years of experience as a freelance artist. His skills and expertise include illustration, art-direction, concept-art, storytelling, and teaching. He creates artworks for comics, books, posters, board-games, video-games, and movies for clients all over the world. If you’d like to check out David’s work, make sure to visit his website, follow him on Facebook, YouTube and Twitter, and support him on Patreon. This article was also published here and shared with permission.


