How to Create a Glitch Effect in Photoshop (Step By Step)

Ever wondered how to create a glitch effect in Photoshop?
That’s what this article is all about.
While glitch art embraces technological mishaps, there are simple ways to introduce a glitch art effect in Photoshop.
And in this article, we’ll take a look at how to get glitchy with a quick-and-easy Photoshop process!
Let’s get started.
What is a Photoshop glitch effect?
Glitches are visual or sonic flaws that are inherent in our digital landscape. Glitch art is made by deliberately capturing these organic glitches, manually corrupting digital media, or physically manipulating electronic devices to cultivate glitched imagery.
Instantly recognizable yet difficult to produce, the glitch aesthetic has fascinated many, with innovative artists harnessing glitches to create unique artworks that explore the fabric of our digital world.
Rewiring Kodak DC series digital cameras to create evocative auroras, Phillip Stearns subverts the nature of digital photography. Art theorist, curator, and visual artist Rosa Menkman also investigates glitch art in the form of video compression and feedback. On her website, Menkman says, “A glitch can be understood as a technological failure, but also as a space for artistic creation.”

Glitches are unstable in themselves, so they’re difficult to anticipate and capture successfully.
But different techniques have emerged to mimic a glitch aesthetic and create evocative, glitchy effects. A Photoshop glitch effect is a way to simulate the glitch aesthetic without the traditional corruption of data.
When should you use a glitch effect?
Glitch art is a visual manifestation of our modern technological climate. Glitches can seem both futuristic and retro, abstract or figurative – but like many art forms, they can also take time to cultivate.
Although creating a glitch effect in Photoshop isn’t an organic source of glitch artistry, the process can be easier to manipulate and control.
So if you’re looking to create glitchy imagery but don’t have the time, equipment, or know-how to wrangle a glitch in the wild, applying a glitchy effect in Photoshop can be a way to explore the unique potential of glitchy aesthetics.
Now let’s take a closer look at how you can actually create a Photoshop glitch effect:
How to create a glitch effect in Photoshop: step by step
To get started, first select an image and open it in Photoshop.
For this project, just about any image will do. I recommend using an image with some variation in color, but you can try a portrait, a landscape, an object study, or something else entirely.
Here’s my starter image:
Step 1: Start with the Channels panel
To work non-destructively, first right-click on your chosen image in the Layers panel and select Duplicate Layer.
In the pop-up window, rename the layer Glitch and click OK.
To apply our glitch effect, we need to work in the Channels panel.
So with the Glitch layer selected, click the Channels tab or go Window>Channels.

Once the Channels panel is open, you’ll see four channels:
RBG, Red, Green, and Blue.
Click on the Red channel to select it. Then, with the Red channel highlighted, select the Filter dropdown menu from the topmost Photoshop toolbar and select Distort>Wave.
In the Waves window, you’ll need to make a few adjustments. The screenshot below shows the settings I generally stick to, but a bit of experimentation can be a good idea, too.

Once you’ve picked your settings, click the Randomize button until you get an interesting preview.
Then select OK.
Next, select either the Blue or Green channel in the Channels panel.
Again, select Filter>Distort>Wave. Your previous settings should be saved in the current Wave window, so just click Randomize a few times and then click OK.
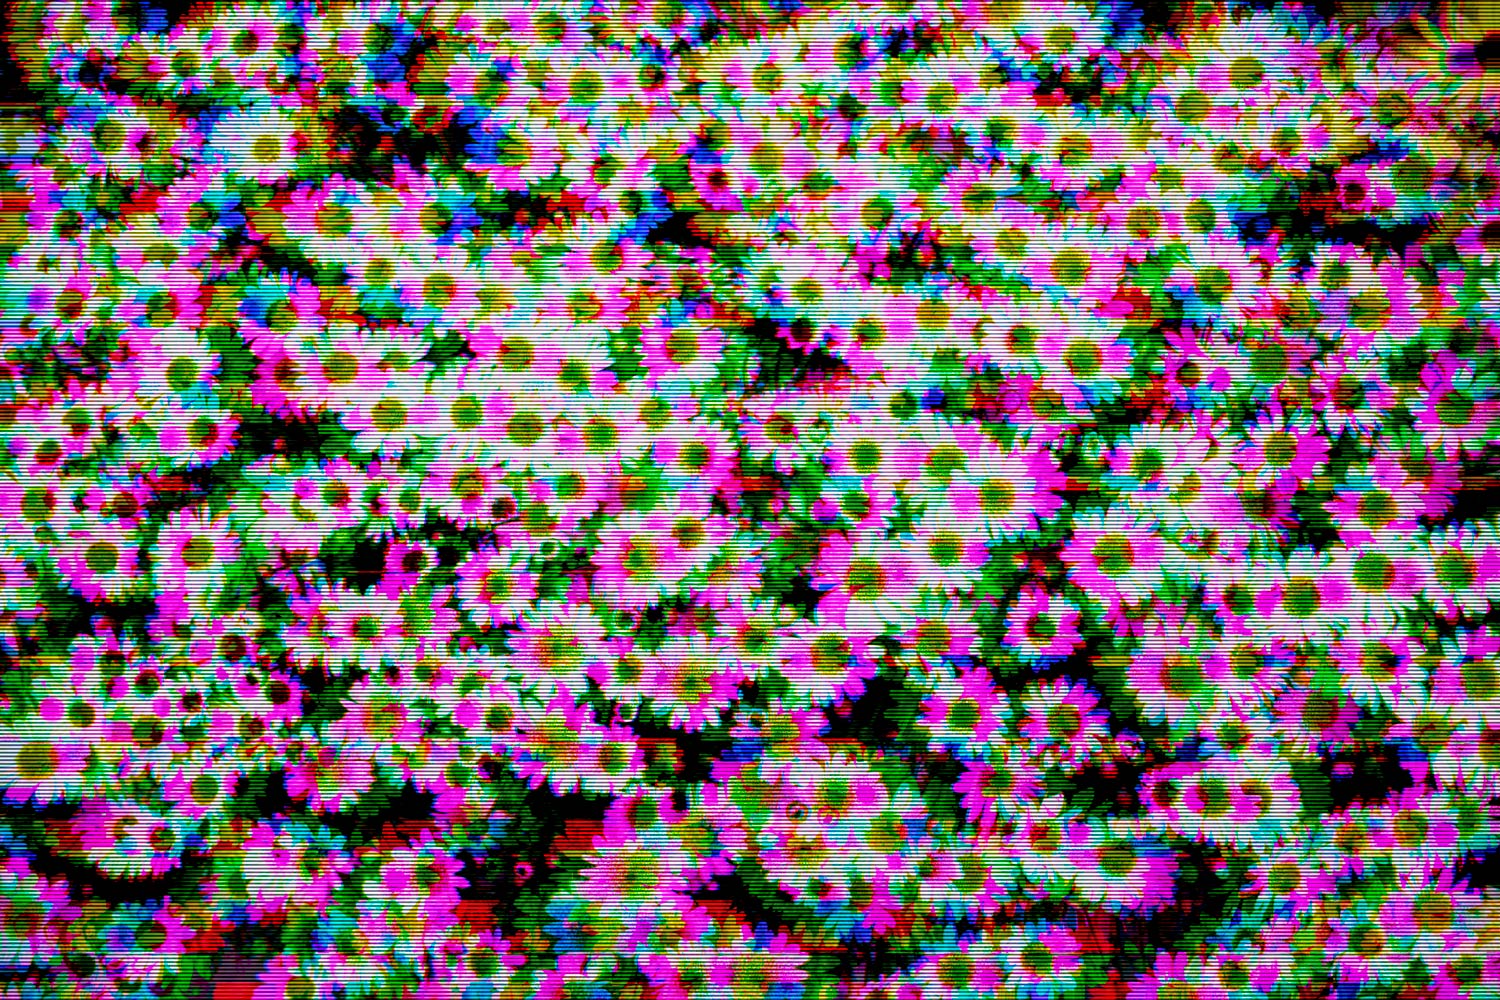
Click on the RGB channel, and you’ll have an effect similar to this:

Step 2: Add a filter
First, return to the Layers panel by clicking on the Layers tab.
Right-click on the Glitch layer and select Duplicate Layer. In the pop-up window, name this duplicate layer Filter, then select OK.
Make sure your color swatches are set to the default (black foreground and white background) or press the “D” key. With the Filter layer selected, go to Filter on the topmost toolbar and then Filter Gallery.
In the Filter Gallery, you have a couple of options to choose from. The Grain filter (under the Texture heading) adds a grainy effect to an image. For glitchy projects, I usually set the Intensity slider here to around 90, the Contrast slider to 50, and the Grain Type drop-down menu to Regular.
Reticulation (under the Sketch heading) can add an eye-catching density to the overall image.
For that filter, I often set the Density slider to around 10-12, the Foreground Level slider to 40, and the Background Level to no more than 10.

The Halftone Pattern filter (also under the Sketch heading) will add vertical lines to an image so it looks like an old TV broadcast.
Adjust the settings for the Halftone Pattern so that the Pattern Type dropdown menu is set to Line. Dial the Size slider to 3 or 4 and set the Contrast slider to 1 or 2.

Film Grain (under the Artistic heading), Texturizer (under the Texture heading), and even Graphic Pen (under the Sketch heading) are also useful filters to experiment with; they’ll add texture and the impression of digital deterioration.
Once you have a filter selected and set, click OK.
Step 3: Select the right blend mode
The next step in how to create a glitch effect in Photoshop is to work with blend modes.
Once your filter is applied, select the Filter layer again and choose a suitable blending mode from the Blending Mode drop-down menu located in the Layers panel.
Different blend modes work differently depending on the image, so don’t be afraid to experiment.
For the image below, I used the Halftone filter combined with the Luminosity blending mode.

Step 4: Add finishing touches
After applying the filter and a blending mode, your image might look a little bland.
So create a Vibrance adjustment layer in the Adjustments panel and give the Vibrance slider a boost.
If the image is still a bit dull, boost the color saturation with the Saturation slider. You can also make adjustments using a Curves layer.
Here’s my final image:

How to create a glitch effect in Photoshop: conclusion
And that’s it! You should now be well equipped to create a beautiful glitch effect in Photoshop.
And though it doesn’t technically create glitch art, this method is an interesting way of presenting digital photographs that remind us about the unique potential and inherent fragility of our technological landscape.
Now over to you:
What subject are you going to use with the glitch effect? Share your glitchy photos in the comments below!


