How to Create and Shoot Night Portraits

If you limit your portrait photography to daylight, you’re missing out on a chance to get some really cool night portraits.
So whether you just want to do a better job capturing portraits at night, or whether you want to know how to light a night scene from start to finish, there’s something in this article for you.
Read on to get some tips to help you create and shoot stunning night portraits!
Get off Automatic mode
If you’re using your camera in Automatic mode, you’ll find one of two things will happen:
With the flash off, you’ll get a really blurry photo – because the camera needs a longer exposure time at night.
Or with the flash turned on, the camera will restrict the shutter speed. And while your subject will be well-lit by the flash, the background will go black.
In other words:
Shooting in Auto is a lose-lose situation, especially if you want a photo of your subject with a cool background.

Night Scene mode
Fortunately, most cameras have a set of helpful scene modes.
On the mode dial (pictured below), there are options such as “M” for Manual mode and “P” for Program mode (or “Professional mode,” as some of my buddies like to joke).
But you’ll also find a series of picture icons, like a mountain or a sprinter. The one you want for night portraits is the Night Scene mode (you may have to go into your menu to find it). It’s usually represented by the moon or a star with a person.
Night Scene mode allows for a longer exposure, but your flash fires as well.
(Note that the mode will occasionally be called “slow sync flash” instead of “Night Scene Mode.”)

So here’s what you do:
First, set the mode. Remember that, because you’ll have a longer exposure, you’ll need to hold the camera steady. Your flash will freeze the subject, yes – but they still need to stay motionless for the entire shot to avoid going transparent around the edges.

Moving to Manual mode
When I shoot nightclub portraits, I’m doing what the Night Scene mode would suggest…
…but I set the camera to Manual.
With Manual mode, you can select an aperture and shutter speed so the background scene looks good or slightly underexposed. Then you can use an automatic on-camera flash to capture your night portrait.

In general, I recommend that photography beginners stick to their Night Scene mode. But as soon as you’re comfortable taking things a step further, switch over to Manual mode and gain control over your exposures!
Next, let’s look at how you can take even more control over your images. As you can probably tell from how Night Scene mode works, you’re effectively taking two shots in one picture. The first is of your subject, and the second is of the background.
Lighting the night portrait subject
For complete control over the lighting on your subject, you need to use a light that’s off-camera.
This doesn’t have to be a flash. In fact, it can even be a streetlight, something I’ll touch on later in the article. It can also be a continuous light that you’ve brought with you, such as an LED or a video light.
However, an off-camera flash will give you the most flexibility, which is why I wholeheartedly recommend investing in one.
To get your flash off-camera, you need a trigger to fire it. Some flashes have built-in receivers, so you can work with a simple remote trigger.
You’ll also need a light stand or someone to hold the flash and aim it for you.
To get an idea of where you can point the flash to achieve great results, check out this article on lighting positions.
And if you want to control the look of the light, make sure you read up on modifiers and their benefits.
The background
The background won’t be heavily affected by the flash, so it requires a longer exposure to look nice and bright (hence the need for Night Scene mode).
So if you want to avoid blurring your background, use a tripod. You might also opt to use a higher ISO, which will allow you to shorten the shutter speed and keep the background (and your subject) sharp.

Getting the shot
When it comes to capturing a night portrait, the first step is to determine how much of the shot you want in focus. A wide aperture like f/2.8 means the background will go out of focus, but the wide aperture also means you can use a shorter shutter speed and still get a well-exposed background. When using flash, the shutter speed isn’t important for the subject’s exposure, so you should aim to get the subject’s flash exposure right first (before considering the background).
Set your aperture and your ISO first; ISO 400 to ISO 800 should be fine. The shutter speed can be anything below 1/200s (or whatever your camera’s sync speed is, which will be in your camera manual).
Tip: If you can’t focus properly, use your phone flashlight to illuminate your subject’s face enough to focus, then switch off the autofocus to keep that focus point locked in.
Aim your flash at the subject and set it to low power (such as 1/32 or 1/16). Take a shot and check it.
If the subject is too bright, turn the flash power down. And if the subject is too dark, turn the flash up.
Finally, if the subject is still too bright, even at the lowest flash setting, try moving the flash away from the subject.

With the flash working, you probably have a black background, as in the image above. But have no fear; you’re only halfway there!
Next, decrease your shutter speed. If you’ve got a live preview on your camera, use it. Make sure it’s set to Exposure Simulation, so you can see exposure adjustments in realtime. As you lower the shutter speed, you’ll see more and more of the background. When you’re happy with how the background looks, you’re ready to shoot!

If your shutter speed is really slow, such as 1/15s or below, encourage your subject to stay still so they aren’t blurred in the image.
Background ideas
Your background can be an interesting building, a bridge, or even just a street. For a really cool look, find somewhere with lots of lights. If you use a wide aperture, these lights will look fantastic.

Using continuous light
If you bring something to light your subject other than a flash, there’s a different juggling act that has to happen.
First, you’ll probably need a higher ISO. For continuous lighting shots, set your background exposure first and then introduce the light on the subject.
For the image below, I brought in an LED video panel. The panel has both brightness and white balance controls, from Tungsten to Daylight. It gives a nice, soft quality of light and looks natural.
Also, with continuous lighting, what you see in your camera’s viewfinder is what you get when you shoot. It is not like shooting flash, where you’re always guessing.

If your light doesn’t have a brightness control, you can move it closer or farther from your subject to change the brightness. This applies to using a streetlight, as well. If your subject is bright compared to the background, simply move them farther away from the light.

For the shot above, I used a streetlight across the road as my main light. I moved my subject until I could see a triangle of light on the side of the face opposite the light. A slight tilt of the head helped, as well.
I chose this spot so that I had the railway bridge and cars behind my main subject, giving the background a little interest without overdoing it.
Shooting with style
To get the best night portraits, you might consider getting someone to do hair and makeup. You can even purchase stylish clothes to make the shot look even better.
Even if you just use friends as models and clothes taken from their wardrobe, it makes sense to look properly professional.

Here’s a selection of night portraits that I’ve done, along with some details about how they were made.

The photo above displays the band, Drown, photographed for Thin Air Magazine. Here, I used the Godox speedlight with a 47-inch octabox off on camera-right. This post-sunset scene was exposed to capture good detail in the clouds, then the flash was set to expose for the subjects. Without flash, the band would have been silhouetted.

The photo above doesn’t contain a sweeping background, but I wanted to create the feel of a busy road. I used two bare-bulb speedlights to give the effect of passing cars lighting the subject from the front and back. In reality, we were on an empty road with no traffic. The backlight was positioned as both a rim light and to add flare.

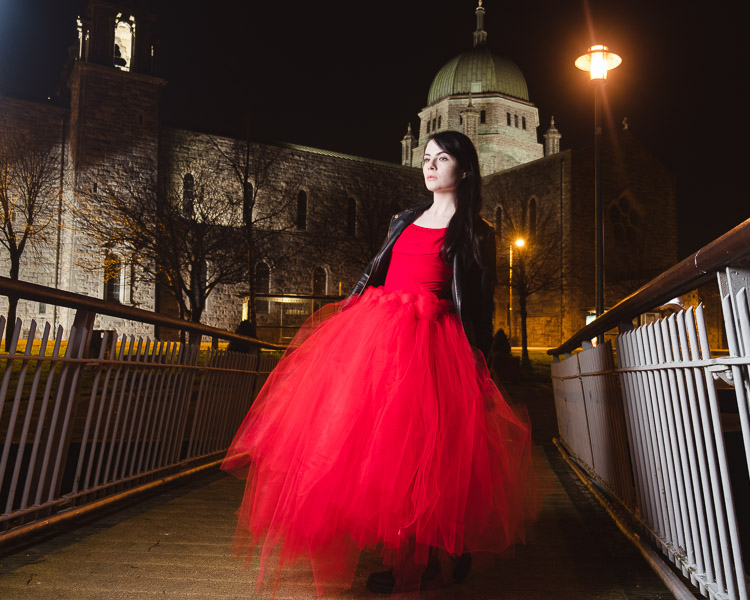
I’ve been doing a series of portraits with a red tulle skirt, so it’s appropriate that I include a few shots here! The image above was captured using a speedlight and my 47-inch octabox. The light was positioned off to the left in order to create a loop lighting pattern.
Ultimately, I balanced the flash and ambient light to get this exposure. There is a mistake in it, though. I really should have used an orange gel to warm up the color of the flash a little – because the flash can look quite blue when shot against tungsten lighting.
Now get out there and try some night portraits!
Hopefully, you now feel like you could take a whole handful of beautiful night photos with minimal effort.
But nothing here will make any difference if you don’t get out there and shoot. If you don’t have any lighting gear, try starting with a battery-powered LED work light.
Also, get your camera off automatic and give yourself more control!
Now over to you:
Have you ever taken portraits at night? What was the trickiest part of the job? Share your thoughts in the comments below!