
How To Save PNG in Photoshop (If Its Not Letting You)
You’ve got your creation exactly how you want it and now it’s time to save it. You want to save it as a PNG. However, when you go to save it, PNG does not appear in the list of file type options that you can choose. What do you do? Shaking your fist at your computer in frustration will do little to resolve the problem. But you’re in luck because reading this article will offer you the answer.

Ready to find out what the trouble is?
PNG problems in Photoshop usually arise because a setting somewhere has changed. You might need to change the color mode, the bit mode of the image, use a different save method, remove any non-PNG allowed formatting or reset the preferences.
I will describe these in detail later but first we will need to discuss PNGs.
What Is a PNG?
If you’re trying to save a file as a PNG, you probably already have an idea of what this file type is good for. Just to make sure we’re all on the same page, we’ll explain PNG briefly here.
First of all, PNG is pronounced “ping” and it stands for Portable Network Graphics. As a file format, it is written .png and appears directly after the file name just like a JPEG or any other file type.
Advantages of Using a PNG File Format
There are a few reasons why PNG files are useful. Let’s look at them here.
Transparency Ability
This file format is particularly beloved by web designers for its ability to support transparent backgrounds as well as images with transparent parts or semi-transparent images. This is useful for creating logos and different types of dynamic website graphics.
Photographers also often use PNG files to create their watermarks. They can place their logo over the image with transparency so it doesn’t block the image beneath, yet ensures that the image can’t be stolen without the photographer’s name going along with it.
We should note that it is the only file format that supports transparency. If you need this feature and Photoshop won’t save as a PNG, this can be a huge frustration as it is your only option. But keep reading, because we’re going to help you fix that problem.
Lossless Compression
Additionally, PNG files employ a data reduction technique dubbed lossless compression. Just as it sounds, when you compress an image, it doesn’t lose any data.
This is great for when you want to resize images and have them look as sharp as the original. This is another reason why logo makers love this file type.
In contrast, JPEGs are lossy, which means that data is deleted when they are decompressed. However, because PNG files retain all the information, they can end up being quite large, which is why photographers typically stick with JPEG format for their images.
No Patent
Finally, PNG files are not patented and thus don’t require a license to be able to use them.
Working with PNG Files
It is easy to work with PNG files. They are a common file type and many programs are equipped to open them. This includes basic photo viewing programs as well as the big wig photo editing programs like Lightroom and Photoshop.
For more information about converting a JPEG image to PNG, check out this tutorial!
Creating PNG Files in Photoshop
In theory, creating and saving PNG files in Photoshop is a piece of cake. The most basic way is simply to use the ‘Save As’ feature. Go to File>Open>Save As. Choose PNG from the dropdown menu of file options and you’re all set.
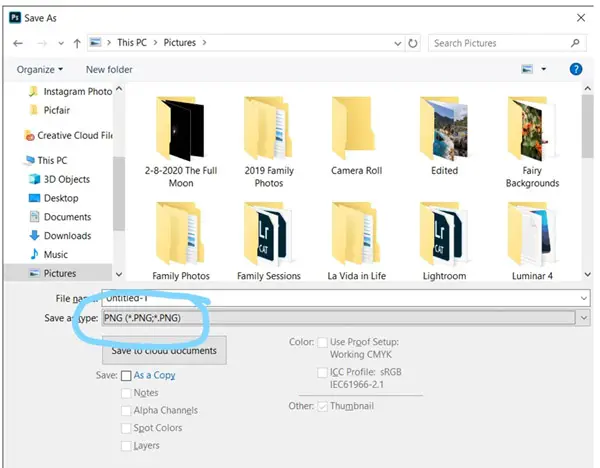
While your file is now saved as a PNG, there is no transparency and the background hasn’t been removed, two of the most common reasons people use PNG files.
If you want to make the image transparent, simply select the background layer in the layers panel. Bring down the opacity until the image reached the desired transparency. Follow the same steps as above to save as a PNG and you’re good to go.
Last, but not least, you can also remove the background (i.e. make it completely transparent) to isolate the subject.
To do this, add a new layer (which Photoshop automatically adds as transparent). Bring this layer under the background layer and select it. You can also unlock the background layer and work with that if you aren’t nervous about making mistakes.
Select the magic wand and Photoshop will automatically select whatever it believes is the subject. Sometimes this works well. If it doesn’t, you’ll need to clean up the selection or make it yourself.
Once you’ve got your subject selected, head up to the menu and choose Select>Inverse. Hit delete and watch the background disappear and be replaced with the exciting checkboard design Photoshop uses to indicate transparency.
But…what happens when it doesn’t work? Many a Photoshop user has gone to save their file as a PNG, only to find that the PNG option doesn’t appear in the dropdown menu.
Luckily, there are a few things you can try.
Why Photoshop Doesn’t Let You Save PNG Files
First, let’s understand why Photoshop doesn’t let you save a PNG. In most cases, there is simply a setting somewhere that has been knocked out of whack.
For example, PNG files are intended for screen use. To that end, they don’t support the CMYK color mode used for printing. We’ll show you how to find this setting and what to change it too in just a moment.
It’s also possible that you may have changed a Photoshop preference that now interferes with the program’s ability to save PNG files. In more rare cases, you may have deleted necessary files, which means you’ll have to reinstall to fix the problem.
Additionally, in the 2018 version of the software, there is a confirmed bug when trying to use “Export as a PNG” instead of “Save as”.
Troubleshooting Saving PNG Files in Photoshop
Now that you understand some common reasons why Photoshop won’t save your file as a PNG, you might have a few ideas about how to save your image as a PNG.
Let’s get started troubleshooting!
Change the Color Mode
As we mentioned, CMYK color mode isn’t compatible with PNG files so the first step is to investigate this. Make a copy of the image and open a new document.
In the settings for your new document, look for the color mode. If it says CMYK, there’s a good chance this is the problem. Open the dropdown box and select RGB color. Paste your copied image into the new document and try the “save as” route once more.
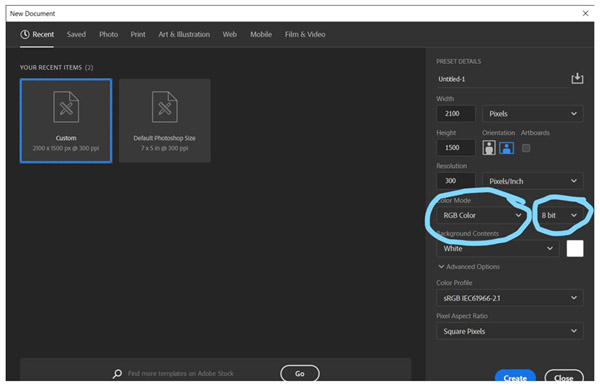
Check the Bit Size
PNG files only support 8-bit or 16-bit/channel RGB. If your bit size has been changed to 32-bit, this could be your trouble. When you open up that new document to check the color mode, also check the bit size.
Open the dropdown menu and choose 8-bit or 16-bit and try to save again.
Remove Non-PNG Allowed Formatting
A simple way to remove all formatting issues is to hold down the option/alt key while selecting File>Save As. This handy shortcut will remove any non-PNG allowed formatting and saves a copy for you to work with.
Use a Different Save Method
A very simple method to get around Photoshop’s insistence on not saving your PNG is to use a different save method. Go to the File menu, but instead of going to the “save as” option, choose Save for Web instead.
You can also try exporting instead of saving. We mentioned earlier there is a bug with the 2018 version, so it may not work for you depending on what version of Photoshop you have. To try it go to File>Export>Export As and choose PNG there.
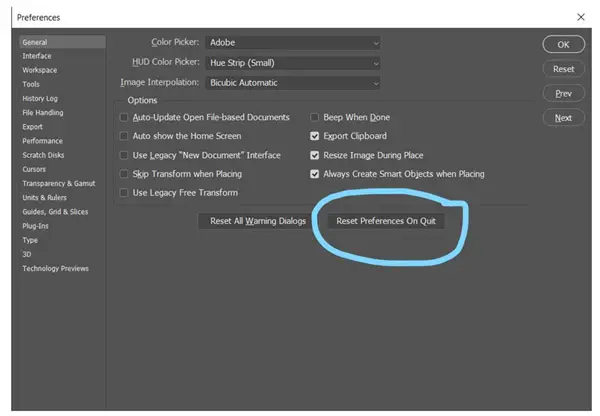
Reset Photoshop Preferences
It’s also possible at some point that you changed a Photoshop preference that is now interfering with your ability to save as a PNG. You can access the preferences by using the hotkeys Cmd+Alt+Shift on a Mac or Ctrl+Alt+Shift on Windows. Choose Photoshop and keep going until you get a prompt asking if you want to reset the preferences.
If you’re having trouble with the hotkeys, go the “slow” route instead. Go to Edit>Preferences>General. In the window, click on Reset Preferences on Quit. Then restart Photoshop (make sure you have your work saved as something first!).
Now try saving as a PNG again and see what happens.
Hallelujah, Your PNG Problems Have Been Resolved!
At least that’s what we hope you’re saying. PNG files are handy files that serve several important purposes and being able to save an image as a PNG in Photoshop often crops up as a necessary task.
We’ve scoured the Internet (okay mainly just the Adobe forums) to find all the ways you can fix this problem. We hope at least one of them works for you.
How’s the rest of your Photoshop experience going? Many people deal with the frustration of a slow brush tool in Photoshop? Check out how to fix brush lag in Photoshop here!

