Why Program Mode is Great for Beginners

Here’s a myth: Being able to shoot in Manual mode is the mark of a professional photographer.
I frequently see articles and beginner photography workshops with titles like Get Off of Automatic Mode. If these instructors don’t promote Manual mode shooting, they will at least tell you that “real” photographers favor Aperture Priority mode. Working with Program mode? They will roll their eyes and joke that maybe you thought the “P” on the mode dial meant “Professional.”

Sure, as you grow as a photographer, you will ultimately want to understand which camera shooting mode might be the best for each situation. But knowing how to drive a manual transmission vehicle will not instantly make you a racecar driver, and knowing how to shoot in Manual mode is not a shortcut to being a great photographer.

I will date myself here, but when I learned to drive, a 1964 manual transmission Volkswagen Beetle was my first car. Learning to operate the gas, brake, clutch, and gearshift was an “interesting” introduction to driving.
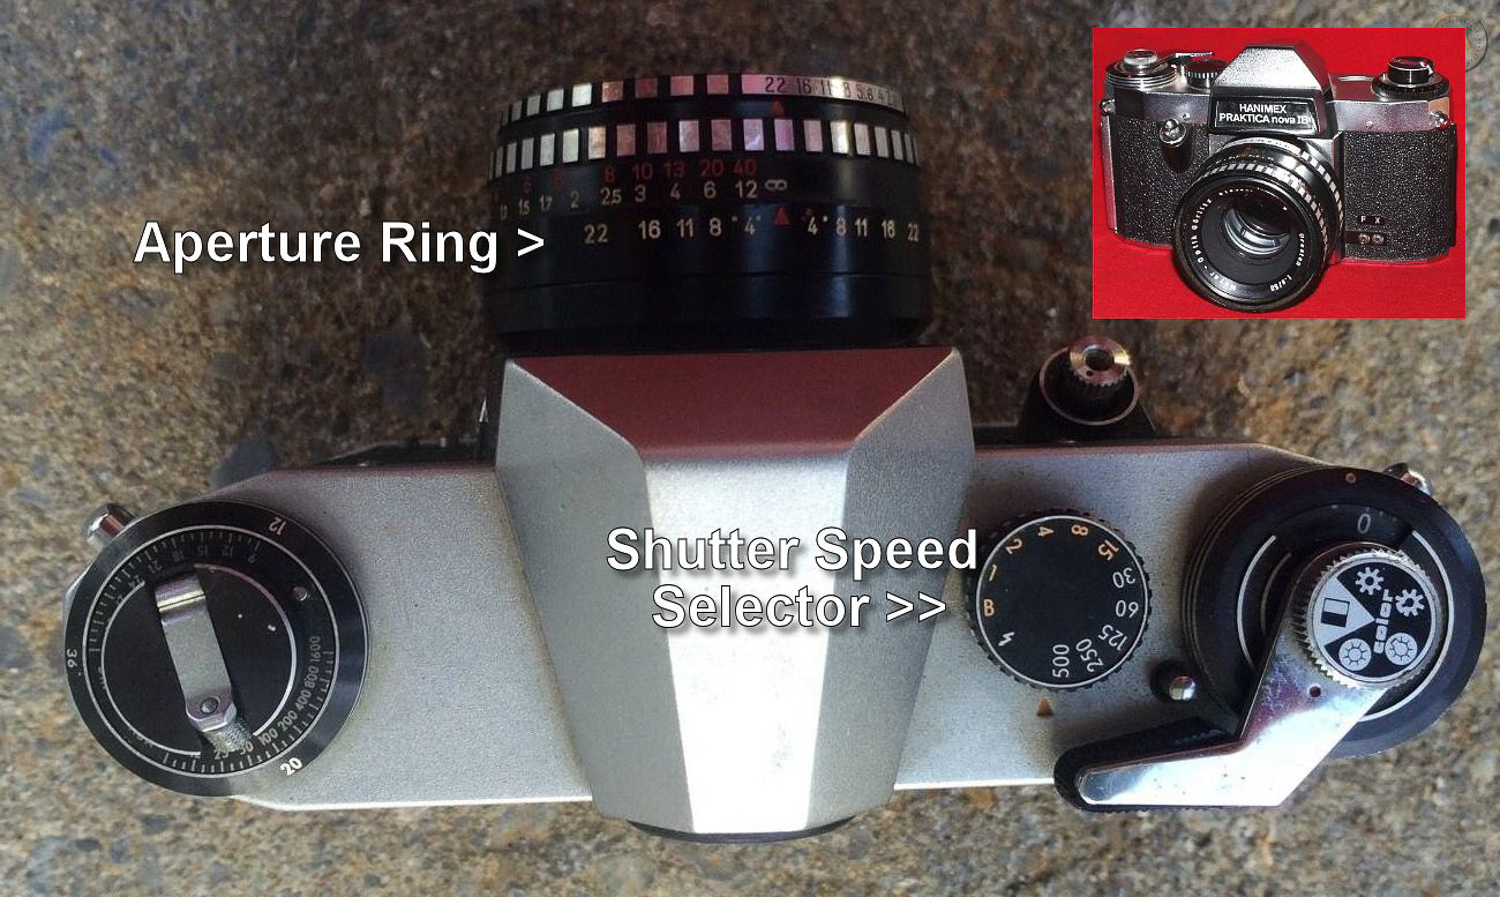
My first camera was an East German Hanimex Practika Nova 1B. That was in the early ’70s. It had no mode dial, no autofocus, and since ISO was controlled by whatever film you used, the only exposure controls were a manual aperture ring on the lens and a shutter speed dial on the top of the camera. Even the exposure meter was not a TTL (through-the-lens) type, but a crude averaging meter that was just above the lens mount.

With both the car and the camera, I had to handle all the controls myself. Did the VW make me a better driver? Did the Praktika make me a better photographer? No, and both caused far more frustration as a beginner than if I had started in a car with an automatic transmission and I had started photography with a fully automatic DSLR.
So that’s my point here:
Why you make a photo – choosing to communicate your vision with an image and then using the camera as a machine to capture it – is far more important than how you shoot a photo or what mode you use. If some help from modern automation makes it easier to get there, especially as a beginner, go for it.
Why get whiplash learning to feather the clutch (or as I once did, roll back into the car behind you when at a stop sign at the top of a San Francisco hill) when, as a new driver, you could have an automatic transmission?

Program mode – yes, the “P” setting on your mode dial – is what I would term the “semi-automatic” mode on your camera. Unlike the green, fully-automatic mode where you simply “point-and-shoot” and the camera makes all the decisions, Program mode frees you to override the settings if you so choose.
Let’s use an example to explain how Program mode might work in a given situation.
Program mode: The “semi-automatic” setting
Back in the 35mm film days, you would often choose the film you used based on the shooting conditions you planned to work in.
ISO (or before that, ASA or DIN) was a function of the film. ASA speeds of common film types might be 25, 64, 125, 200, 400, and maybe up to 800. You could go a little higher with special processing. The rub was that, whatever film type you chose, you worked with the same ASA for the entire roll (be it 12, 24, or 36 exposures).

Working with Program mode can be a little like shooting film – in that the first thing you will do is pick your ISO setting.
This could be ISO 100 for good outdoor light, maybe ISO 200 or 400 for lower lighting conditions, ISO 800 or higher for dim conditions (or perhaps for when you will be shooting action and need to be able to use short exposure times).
Some have called Program mode “ISO Priority,” because once you choose the ISO, it will be the setting that will stay set, even as the shutter speed and aperture change. (Of course, the big difference from film is that you can change the ISO from shot to shot if you so choose).
So you start by setting your ISO.
Then, unless you have a special reason not to, I suggest you use the averaging metering modes: Evaluative on Canon, Matrix on Nikon. These will consider the entire image and calculate the exposure.
If your camera is set to Program mode, you will now see that it has selected both aperture and shutter speed settings. Depending on the available light, these will usually be toward the middle of the settings range – perhaps something like 1/125th of a second, f/5.6, and ISO 100. You may want to change these, and we’ll get into that in a minute, but if not, you’re good to go. Nail focus and take the shot.
You can shoot all day like this, the camera pretty much working as a point-and-shoot machine. As a beginner, rather than puzzle over what your settings should be for each shot, you can concentrate on more important things – chiefly composition – and let the camera figure out the exposure. Take away the clutch and the gearshift and driving is so much easier, right?
Creative control
The one thing you relinquish when you allow the camera to make exposure setting decisions is creative control. We may go a long way with artificial intelligence, but soulless computers or robots, while able to nail exposure, get perfect focus every time, and maybe even edit the shot afterward, will never be able to make true art.
Two concepts to understand as a beginning photographer are how aperture and shutter speed controls not only the exposure, but also the depth of field and the freezing/blurring of motion. If you have not fully grasped those creative concepts, I encourage you to spend time learning the relationship between aperture and depth of field, as well as the relationship between shutter speed and motion capture.
Working with Program mode will almost always get you a correct exposure, but you will also need to understand when you want to override the suggested settings to get the creative look you seek.
Some examples
Let’s break down how you might work in Program mode for different interpretations of the same subject.
- It’s an overcast day, so you set the ISO to 800.
- Your camera is in Program mode and it suggests an exposure.
- You decide you want a deeper depth of field, so you set the aperture to f/22. (Aperture can typically be changed with one dial and the shutter speed with another. Note that when you change one setting, the other setting automatically changes to maintain proper exposure.)
- Your settings are now ISO 800, 1/20s, and f/22. (Note that you’ll need to be on a tripod with a 1/20s shutter speed.)
- You focus, then take the shot.

You take a look and decide it might be better to isolate the foreground leaves with a shallow depth of field. Still in Program mode, you roll one of your dials to put the aperture at f/4. Your camera automatically adjusts the shutter speed to 1/640th of a second to maintain proper exposure. You take another shot.

Easy, huh? The ISO stayed locked in at 800, and as you adjusted the aperture, the shutter speed adjusted itself.
Suppose now you want to see the effect of shutter speed on a moving object. Still in Program mode, you leave the ISO at 800. To freeze the droplets of a fountain, you roll the dial to get a 1/1600th of a second shutter speed. You take the shot.

Now, what if you want to get a little motion blur on those drops? Roll the dial to set a slower shutter speed of 1/50th of a second. The aperture automatically adjusts.
Exposure compensation is also possible should you need to make your images a little lighter or darker.
I mentioned earlier that you could lock in your ISO when working with Program mode. Depending on your camera, you might also let the ISO automatically adjust as light conditions change. Try Auto ISO in combination with Program mode and see how it works for you.
Then make the leap
Program mode can help you get good exposures. And if you pay attention to the settings it chooses, you’ll begin to understand the relationship between aperture, depth of field, shutter speed, and motion capture. Program mode can also give you a good jumping-off point to work with a mode such as Aperture Priority.
Say that after making a shot in Program mode, you see the camera chose f/11 as the aperture, and you like the amount of depth of field that resulted. You can then switch over to Aperture Priority mode (Av on Canon, A on Nikon), dial in an f/11 aperture, and start shooting. The camera will stay locked at f/11 while adjusting the shutter speed for various lighting conditions.
The same goes for shutter speed. If your Program mode shot shows a nice amount of motion blur at 1/5th of a second and you want to make subsequent images with that amount of blur, switch to Shutter Priority mode (Tv on Canon, S on Nikon), dial in 1/5th of a second, and shoot away.
The camera will stay locked on the shutter speed you chose and alter the aperture as needed.

Back to the safe spot
If you play around enough with settings, you may eventually mess things up to where you reach a bad exposure or become totally confused about why things are not working for you. That’s when Program mode comes to the rescue.

Put the camera in Program mode, put the ISO back to a setting appropriate for your lighting situation (ISO 200 might be a good starting point), and it’ll be like hitting the reset button: you’ll be back to letting the camera choose exposure settings.
If you find Auto ISO works well, try that, too. The idea is to have a setup you can always turn to if you get confused (one that you can rely on to make good exposures consistently if needed).

Regardless of what mode I choose to shoot in, even Manual, I always put the dial back to Program mode before turning off the camera and putting it back in my bag. Then, if that once-in-a-lifetime shot presents itself and I must grab the camera, quickly power up, and shoot, I can be assured I will get a reasonably well-exposed shot.
I hope you will not take this article to mean you shouldn’t learn to shoot in Aperture Priority mode or Manual mode, because it’s true that a great number of professionals use these settings. But if you are new to photography and are confronted with more information than you can immediately absorb, working in Program mode might just be the helping hand you need.

Concentrate first on learning good composition. And make sure your images are well-focused, because blurry shots are impossible to fix in editing.
For now, let your camera help you with exposure until you begin to wrap your head around all there is to know. Even if you are a more experienced photographer, you might occasionally find that turning the mode dial and working in Program mode is the right choice for a given situation.
Mode doesn’t matter

People don’t usually ask what kind of paint, brushes, or canvas Leonardo da Vinci used when he painted the Mona Lisa. And when you make a great shot, no one should care what camera mode you used, what your settings were, or even what camera and lens you used.
Conversely, when your shot is poorly composed, doesn’t have an easily identifiable subject, or just doesn’t speak to the viewer, it doesn’t matter how masterful you might be in Manual mode or if you have the best camera money can buy.
Determine why you want to make a particular photo, find your vision, know what it is you want to communicate, and then use the machine that is your camera to produce that image. If working in Program mode gets you to that result, it’s a perfect choice.
Best wishes for great photos!
What do you think about Program mode? Have you ever used it? Why or why not? Share your thoughts in the comments!


